Design Database
Database scripts can be downloaded from http://www.box.net/shared/p467v0emqq
Create Entity Objects.
Create View Objects.
Bundle all in Application module.
Create Bounded Task Flow
Bounded task flows have some key features like
- They have a well defined transaction boundary and have a single entry point and zero or more well defined exit point.
- Able to do database Rollback or commit on successful exit.
- Able to pass input parameters from task flow caller to store with in the page flow scope.
- Able to return values on successful exit.
- Declarative support for next and back buttons.
Create Employee Basic page:

Figure 2: Create Bounded task-flow design
Add

Figure 3.1: Create Employee Basic Info Page (step1)
From Component palate select Panel Header and drag it on the page and it will create panel header.
We can change the name of the default panel header.

Figure 3.2: Create Employee Basic Info Page (step 2)
From data control palate select EmployeeBasicInfoView1 under EmployeeAppModuleDataControl and drag it under the panel header and from list of available faces select ADF form and change the label messages. Add below to set navigation from one page to another in a bounded control flow and create another Employee
- <af:panelGroupLayout layout="horizontal">
- <af:trainButtonBar value="#{controllerContext.currentViewPort.taskFlowContext. trainModel}"/>
- <af:commandButton text="create Another" actionListener="#{bindings.Create.execute}"/>
- </af:panelGroupLayout>
The resultant page looks like

Figure 3.3: Create Employee Basic Info Page (step 3)
- Create Employee Contact Info page
- Similarly create Contact Info page as Employee Basic Page and the page will look like

Figure 4: Create Employee Contact Info Page Create Employee Education Info Page
Similarly create Contact Info page as Employee Basic Page and the page will look like

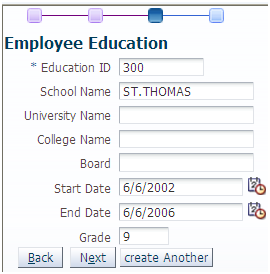
Figure 5: Create Employee Education Info Page
Create Employee Job Page
Similarly create Contact Info page as Employee Basic Page and the page will look like

Figure 6: Create Employee Job Info Page
Add below to set navigation to task flow return
- </af:panelFormLayout>
- <af:panelGroupLayout layout="horizontal">
- <af:trainButtonBar value="#{controllerContext.currentViewPort.taskflowContext.trainModel}"/>
- <af:commandButton text="Submit" action="success"/>
- <af:commandButton text="Cancel" action="cancel"/>
- </af:panelGroupLayout>
From Component palate select "Task Flow Return" and drag it to the task-flow-definition page and rename it to taskFlowReturnSuccess and taskFlowReturnCancel and draw two control flow cases, one for Success and one for cancel.

Figure 7: Completed task-flow-definition
Create ADF configuration page:
Create View which takes all Entity
- WHERE EmpBasicInfo.EMPID = EmpMasterTbl.EMPID
- and EmpContactInfo.ADDRID = EmpMasterTbl.ADDRID
- and EmpEduInfo.EDUID = EmpMasterTbl.EDUID
- and EmpJobInfo.JOBID = EmpMasterTbl.JOBID
- and EmpMasterTbl.EMPID = :ThisEmpID
- and EmpMasterTbl.ADDRID = :ThisAddrID
- and EmpMasterTbl.EDUID = :ThisEduID
Create User Interface
Please refer to my previous blog "Basic Database operation using ADF" to see how to create a search pageDeployment and Test
- Click on Create Employee
- Enter Details for Employee basic Info
- Enter details for Employee Contact Info
- Enter details for Employee Education Info
- Enter details for Employee Job info and Master Table Details.
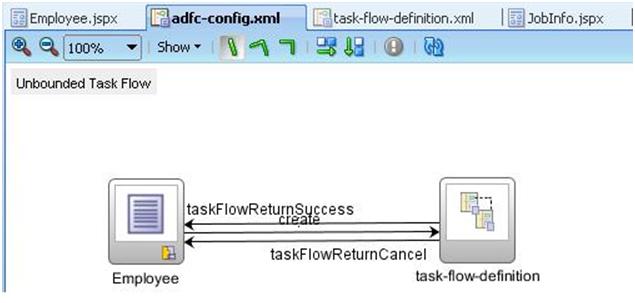
Figure 8: Create ADF configuration Page
Drag task-flow-definition to the adfc-config.xml and as a bounded task flow call.
Create Employee.jspx which calls bounded task flow

Figure 9: Create view for Search employee
Add below where clause which will ask user to give input for employee id, address id, education id and job id to search employee.

Figure 10: Employee Content Portal


We need to click on Submit so that the data will get persist on database.

Click on Search button to get corresponding data.
The use case I had shown is having a drawback like data from table got automatically populated (as Shown Below) as user navigates to the bounded taskflow region from main page for creating a new Employee. In my new post (http://anindyabhattacharjee.blogspot.com/2010/08/bounded-tasf-flow-in-popup-and.html) I am trying to make some modification in my ViewController project so that the issue got resolved.
ReplyDeleteHello great post. i ca not find: previous blog "Basic Database operation using ADF" to see the hole example.
ReplyDeleteHello toston,
ReplyDeleteThanks for your feedback. Please refer below link for "Basic Database operation using ADF"
http://anindyabhattacharjee.blogspot.com/2010/06/basic-database-operations-in-adf.html
Can you publish the project?
ReplyDelete