Tuesday, June 8, 2010

Communicating between pages in ADF 11g (11.1.1.2.0)

In this blog what I am trying to implement is communication between two ADF pages. Here I have a main page (Figure 10) where user can click on the search icon and control shifts from that page to a dialog page (Figure 11) . And when user clicks the done button from the dialog page then selected values (here I am using Empid as an example) will come from dialog page to main page for further use. Please refer below snaps
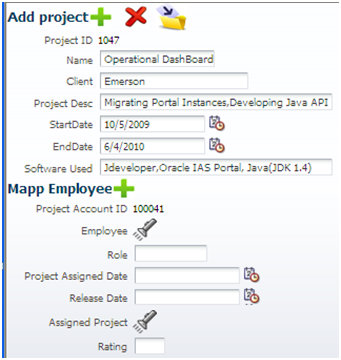
 

Source Page                                                          Destination Page

Now I will show as step by step way how we can achieve it.
Creating a view is primary one as I had already shown in my previous blog.
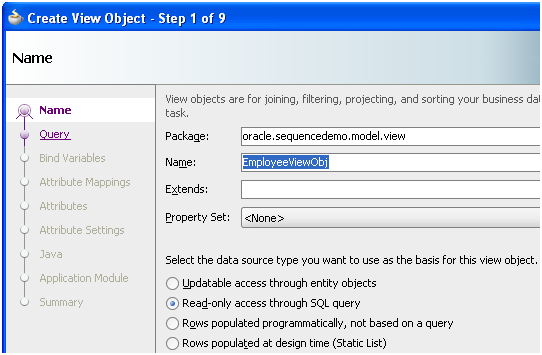

Figure 1
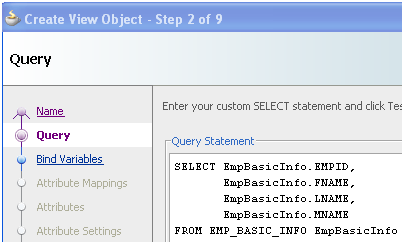
Figure 2
let’s design the destination page first i.e.the page where user can select an employee and the data is returned to the “Add Project page”. From Application Module we need to select the view which is got created as Figure 2 above and drag it to the page and then we will be prompted to select a container. Here I have selected trinidad table.
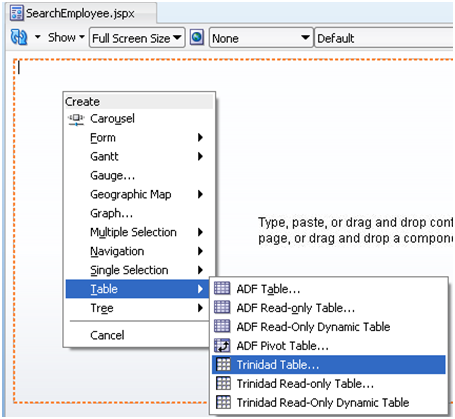

Figure 3


Figure 4


Figure 5


Figure 6

In destination page we need to add a commandlink and it’s code looks like below

  1. <f:facet name="actions">
  2. <tr:commandLink>
  3. <tr:image source="/Icons/done.png" inlineStyle="width:30px; height:27px;"/>
  4. </tr:commandLink>
  5. </f:facet>


where entry for “tr” and “f” are as follows xmlns:f=http://java.sun.com/jsf/core and xmlns:tr=http://myfaces.apache.org/trinidad.The image I have used like this .

Please make sure that you have included below libraries.


Figure 7

And Finally the page looks like


Figure 8

Below figure shows the code snippet of source page (Add Project) from where user is navigated to the page shown in Figure 8. After selecting the container type as ADF form (after following the step like drag and drop view objects from data control palate), we get all viewable columns as wrapped in <af:panelLabelAndMessage>. As our objective is to add a command link beside Employee id which will direct us to the destination page we need to modify default ADF panel form. Before adding the command link the code will look like as left side and after adding it will look like as right side (code shown in red color is added only for command link).


Figure 9

Now here comes the tricky part , when user in destination page selects a particular row and click on the "done" button on left top corner then what will happen? Till now what I have shown the code will go nowhere as there is no ActionListener defined.

So we need to define ActionListener as follows

  • Go to Properties of <tr:commandLink > and select Property Menu for Action Listener ( ) and select edit.
  • A new dialog wizard will open. We can create a new Managed Bean and method by clicking new or we can select an existing one.
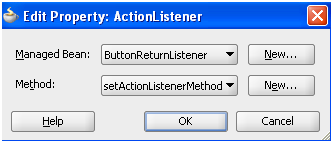
     

    Figure 12

  • We can use JSFUtils.java (download Source code from: http://www.box.net/shared/mnhtms45hm ) to get Application module reference. We need to add it in our project.
  • My customization on managed bean (download source code from : http://www.box.net/shared/u5gn9g9rz8 )is as follows


Step 1: Getting Application Module reference :

Please refer below link http://anindyabhattacharjee.blogspot.com/2010/06/get-application-module-reference.html

Step 2: (ActionListener functions) Earlier we had created an attribute named "Empid" and its data source is set as <ProjectAppModuleDataControl.EmployeeViewObj1 >. Now we need to set the value of this attribute to the value specified by user.

Step 2.1: Take value from user specified row


  1. public String getSelectedRowValue() {
  2. System.out. println ("In Set Action Listener for Search Employee"); //Getting Application Module Reference as specified in Step 1. dataControlName is set to ProjectAppModuleDataControl
  3. ProjectAppModule prjappmdl = ( ProjectAppModule )getApplicationModuleForDataControl(dataControlName); Getting selected row of EmployeeViewObj1 view.Earlier we had created the read only table based on EmployeeViewObj1 and select the "Row selection" behavior getCurrentRow() gives reference of that row.
  4. Row row = prjappmdl. findViewObject ("EmployeeViewObj1"). getCurrentRow() ; // get the Empid value from selected row.
  5. String str = row. getAttribute ("Empid"). toString() ;
  6. System.out. println ("Employee Id selected " + str);
  7. return str;}


Step 2.2 : Set value from Step 2.1 to created Attribute. This method is used as ActionListener

  1. public void setActionListenerMethod( ActionEvent event) { //Get Selected Row value
  2. String str = getSelectedRowValue();
  3. FacesCtrlAttrsBinding attribute = null;
  4. System.out. println ("Entering ButtAction");
  5. BindingContainer bindings = BindingContext . getCurrent() . getCurrentBindingsEntry() ; // Get List of all Attributes
  6. List attr = bindings. getAttributeBindings() ; // traverse all Attributes
  7. for ( Iterator it = attr. iterator() ; it. hasNext() ; ) {
  8. Object o = it. next() ;
  9. if (o != null) {
  10. if (o instanceof FacesCtrlAttrsBinding ) { //assign object reference from list of attributes to FacesCtrlAttrsBinding
  11. attribute = (( FacesCtrlAttrsBinding )o);
  12. System.out. println ("total attribute Count: " + (attribute. getAttributeCount() ));}}}
  13. String[] attributename = attribute. getAttributeNames() ;
  14. for ( int i = 0; i < attributename. length ; i++) {
  15. System.out. println ("attribute name " + attributename[i]);
  16. if (attributename[i]. equals ("Empid")) {
  17. attribute . setInputValue (str);
  18. System.out. println ("Attribute Value " +attribute. getInputValue ()); }}}

We have created an attribute as figure 6. Now I am using that attribute value in line 16.

Now we need to set a ReturnActionListener method in source page.Till now what we achieve is taking the value from user selected Row in destination page, but how come the data becomes available when control comes back to the main page from destination page. For that we need to define a method in returnListener attribute at source page.
setEmployeeID is a custom method defined in Application module Implementation class.

  1. public void searchEmployeeReturnListener(ReturnEvent retevent) {
  2. System.out.println("In Return Listener"); //Getting Return Value
  3. oracle.jbo.domain.Number retval = ( oracle.jbo.domain.Number )retevent. getReturnValue ();
  4. System.out. println ("Return Value " + retval. toString ()); //Use Returned value in main page //Getting ApplicationModule reference programatically
  5. ProjectAppModule prjappmdl = ( ProjectAppModule )getApplicationModuleForDataControl(dataControlName);
  6. prjappmdl. setEmployeeID (retval);
}

But please note that We need to add this method as client interface so that the method is accessible from Managed bean . In Application Module XML file we need to add this

  1. <ClientInterface>
  2. <Method Name="setEmployeeID">
  3. <Return Type="void"/>
  4. <Parameter Name="num" Type="oracle.jbo.domain.Number"/>
  5. </Method>
  6. </ClientInterface>

Get Application Module Reference Programmatically in ADF 11.1.1.2.0

Getting Application Module reference using datacontrol name:

We can write this piece of code in our managed Bean. Application Module has direct visibility to view and entity so we may need to access Application Module from our user interface.We can pass data control name as string to getApplicationModuleForDataControl function

  1. public static ApplicationModule getApplicationModuleForDataControl(String name) {
  2. System.out.println("#{data." + name + ".dataProvider}");
  3. return(ApplicationModule)resolveExpression("#{data." + name + ".dataProvider}");}

Where resolveExpression()

is defined as
//Argument expression is #{data.ProjectAppModuleDataControl.dataProvider} where ProjectAppModuleDataControl is data control name
  1. public static Object resolveExpression( String expression){ //A FacesContext instance is associated with a particular request at the beginning of request processing, by a call to the getFacesContext() method of the FacesContextFactory instance associated with the current web application
  2. FacesContext ctx = getFacesContext() ; //Getting Application Reference
  3. Application app = ctx. getApplication() ; //createValueBinding(String expr) converts String expr to Value Binding expression which is used to bind UI Components i.e.(data. ProjectAppModuleDataControl.dataProvider) or their values to external data source
  4. ValueBinding bind = app. createValueBinding (expression); //Getting Value from ValueBinding Expression
  5. return bind. getValue (ctx); }

Entity object Primary Key in ADF(11.1.1.2.0) takes negative values from DB Sequence: Work Around

In my previous Blogs I have shown how to insert data into tables but one drawback of that example is the database design I had made. For sake of simplicity I had made the Primary Key Editable which leads to an impractical database design. In this blog I am trying to implement while inserting data into table each time we press create button, primary key of corresponding table is automatically uploaded from database sequence.

I have created a database table PROJECT_DETAILS as follows

  1. CREATE TABLE project_details(
  2. project_id VARCHAR2(12),

  3. project_name VARCHAR2(22),
  4. client_name VARCHAR2(30),
  5. description VARCHAR2(50),
  6. startdate DATE,
  7. enddate DATE,
  8. software_used VARCHAR2(50))); --Add primary Kry
  9. ALTER TABLE project_details ADD CONSTRAINT proj_pk PRIMARY KEY(project_id); --Create Sequence
  10. create sequence PROJ_SEQ increment by 1 start with 1000;

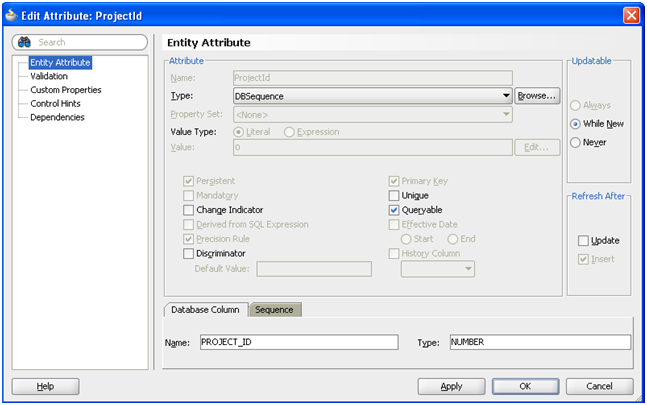
In fact Oracle ADF has the flexibility to use database sequence, while creating entity object we can set value of Primary key as DBSequence.


Doule Click on Project ID will lead to a screen where you can specify whether this ProjectId will act like a noramal string and editable or takes automatically uploaded DBSequence value from database.


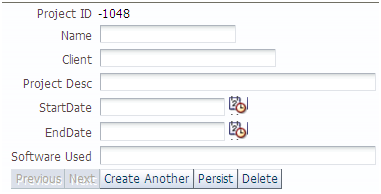
But while testing It always takes negative Sequence Number as we press "create Another Button".


As a work around I have overridden the create method in Entity Implementation java class ( ProjectEntityObjectImpl . java ) like below.
Algorithm:

//Getting reference of all Attributes belongs to the entity
  1. protected void create( AttributeList attributeList){
  2. super . create (attributeList);
  3. AttributeDef[] attrArray = getStructureDef() . getAttributeDefs() ;
  4. AttributeDef attr = null; //Traverse through the array to get hold of primary key Attribute
  5. for ( int currIndex=0;currIndex<=attrArray. length ();currIndex++){ //If primary key found then move out from loop after give that reference to attribute definition.
  6. if (attrArray[currIndex]. isPrimaryKey() )
  7. {attr = attrArray[currIndex];
  8. break ;}
  9. } //Hold index of the primary key attribute
  10. int index= attr. getIndex (); //Hold sequence name
  11. String sequence = "PROJ_SEQ"; //Create SequenceImpl object using database sequence name.
  12. SequenceImpl seq = new SequenceImpl (sequence, getDBTransaction ()); //Set Attribute value
  13. setAttributeInternal (index, new DBSequence (seq. getSequenceNumber() ));}

While testing the same in Browser it takes 1048 automatically from sequence and Thus we can achieve that Primary key should not be in editable format.

Insert Into Multiple Tables using Bounded TaskFlow in ADF 11.1.1.2.0


  • Design Database

Database scripts can be downloaded from http://www.box.net/shared/p467v0emqq

  • Create Entity Objects.

  • Create View Objects.


  • Bundle all in Application module.


  • Create Bounded Task Flow

Bounded task flows have some key features like

  • They have a well defined transaction boundary and have a single entry point and zero or more well defined exit point.

  • Able to do database Rollback or commit on successful exit.

  • Able to pass input parameters from task flow caller to store with in the page flow scope.

  • Able to return values on successful exit.

  • Declarative support for next and back buttons.


Create Employee Basic page:


Figure 2: Create Bounded task-flow design
Add

<af:train value="#{controllerContext.currentViewPort.taskFlowContext.trainModel}"/>
under
<form>
in source code of start_emp_basic.jspx page.
Figure 3.1: Create Employee Basic Info Page (step1)
From Component palate select Panel Header and drag it on the page and it will create panel header.
We can change the name of the default panel header.

Figure 3.2: Create Employee Basic Info Page (step 2)
From data control palate select EmployeeBasicInfoView1 under EmployeeAppModuleDataControl and drag it under the panel header and from list of available faces select ADF form and change the label messages. Add below to set navigation from one page to another in a bounded control flow and create another Employee

  1. <af:panelGroupLayout layout="horizontal">

  2. <af:trainButtonBar value="#{controllerContext.currentViewPort.taskFlowContext. trainModel}"/>

  3. <af:commandButton text="create Another" actionListener="#{bindings.Create.execute}"/>

  4. </af:panelGroupLayout>

The resultant page looks like


Figure 3.3: Create Employee Basic Info Page (step 3)

  • Create Employee Contact Info page
  • Similarly create Contact Info page as Employee Basic Page and the page will look like


    Figure 4: Create Employee Contact Info Page
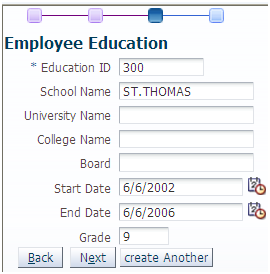
  • Create Employee Education Info Page

Similarly create Contact Info page as Employee Basic Page and the page will look like

Figure 5: Create Employee Education Info Page

  • Create Employee Job Page

Similarly create Contact Info page as Employee Basic Page and the page will look like


Figure 6: Create Employee Job Info Page

Add below to set navigation to task flow return


  1. </af:panelFormLayout>

  2. <af:panelGroupLayout layout="horizontal">

  3. <af:trainButtonBar value="#{controllerContext.currentViewPort.taskflowContext.trainModel}"/>

  4. <af:commandButton text="Submit" action="success"/>

  5. <af:commandButton text="Cancel" action="cancel"/>

  6. </af:panelGroupLayout>

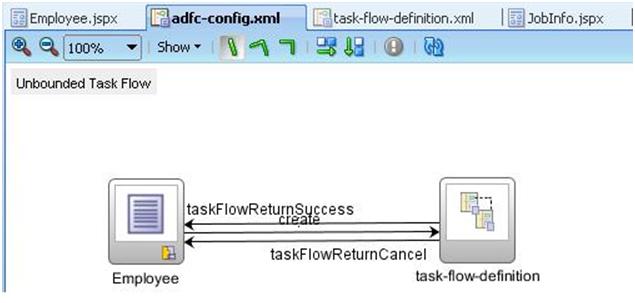
From Component palate select "Task Flow Return" and drag it to the task-flow-definition page and rename it to taskFlowReturnSuccess and taskFlowReturnCancel and draw two control flow cases, one for Success and one for cancel.


Figure 7: Completed task-flow-definition

  • Create ADF configuration page:


    Figure 8: Create ADF configuration Page

    Drag task-flow-definition to the adfc-config.xml and as a bounded task flow call.
    Create Employee.jspx which calls bounded task flow

    • Create View which takes all Entity


    Figure 9: Create view for Search employee

    Add below where clause which will ask user to give input for employee id, address id, education id and job id to search employee.

    1. WHERE EmpBasicInfo.EMPID = EmpMasterTbl.EMPID

    2. and EmpContactInfo.ADDRID = EmpMasterTbl.ADDRID

    3. and EmpEduInfo.EDUID = EmpMasterTbl.EDUID

    4. and EmpJobInfo.JOBID = EmpMasterTbl.JOBID

    5. and EmpMasterTbl.EMPID = :ThisEmpID

    6. and EmpMasterTbl.ADDRID = :ThisAddrID

    7. and EmpMasterTbl.EDUID = :ThisEduID


    • Create User Interface


      Please refer to my previous blog "Basic Database operation using ADF" to see how to create a search page


    • Figure 10: Employee Content Portal

    • Deployment and Test


    • Click on Create Employee

    • Enter Details for Employee basic Info


    • Enter details for Employee Contact Info


    • Enter details for Employee Education Info


    • Enter details for Employee Job info and Master Table Details.


    We need to click on Submit so that the data will get persist on database.


    Click on Search button to get corresponding data.

Incorporating BI in ADF 11.1.1.2.0

In my earlier blog (basic database operations in ADF) I have shown basic CRUD operations on "EMP" table. Let's make that page more interesting. Currently let's set our objective like Display Graphical analysis on number of employees and expenses pertaining to a department

Graphical analysis on DEPT:

  • Create view in Model Project.


    Figure 1

    Here we are going to create a read only view using a SQL query which is as follows
    select count(empno),Sum(SAL),DEPTNO from emp group by DEPTNO
    . We can use the query in the query section of configuration wizard of that view.


    Figure 2


  • Add View in Application Module


Figure 3

Created view needs to be added with existing application module so that it becomes visible from user interface through data control.


Figure 4

We can change the default view name to any suitable name

  • Modifying Appearance


Figure 5

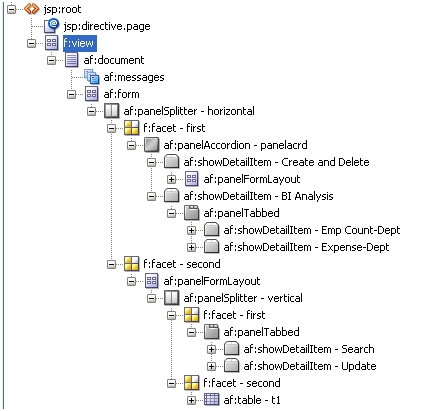
Previously only single "panelFormLayout" exists under "first" facet and that panelFormLayout holds entire form where we can create and delete employee, now we create a panelAccordion under first facet, which allow us to switch between more than one panel at runtime which comes under that panelAccordin. Here page structure becomes


Figure 6


Figure 7
  • Add Graph in Page


Figure 8

Select "GraphDeptViewObject" under "SampleAppModuleDataControl" and drag it to the region under "Emp Count-Dept" detail item. We will be prompted to use rich face from available rich faces. We need to select graph.


Figure 9

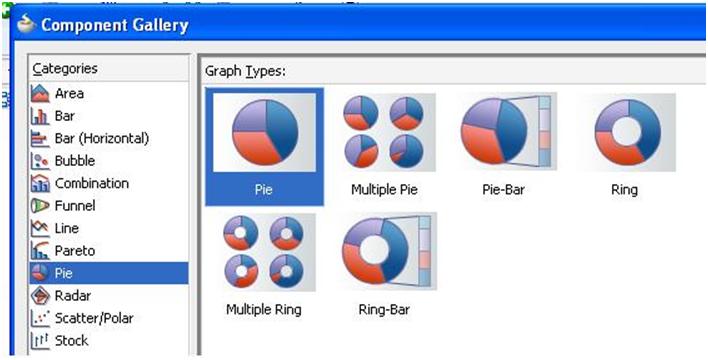
From a list of all available graph items I have taken pie as an example,


Figure 10

We need to monitor on number on employees on a particular department so each and every slice of pie corresponds to a department and the data points on that pie will be selected from a list of dropdown box that comes beside "Pie" label.


Figure 11

Click on Expenses- Dept tab and select "GraphDeptViewObject" under "SampleAppModuleDataControl" and drag it to the region under "Emp Count-Dept" detail item. We will be prompted to use rich face from available rich faces. We need to select graph. Here I have taken "Bar" as a display model.


Figure 12

We need to monitor total salary for each and every department so each bar pertaining to a department shows total salary and X axis depicts department.


Figure 13

This is the complete view of our resultant page.

  • Test and Deployment


Figure 14


Basic Database operations in ADF 11.1.1.2.0

Operations refers here is Create-Retrieve-Update-Search on a database tables. In this blog I have shown how to do these 4 operations on a table using a single user interface. Jdeveloper is my favorite design tool and I have done this using Jdeveloper(11.1.1.2.0). While testing that pages I have used Embedded Weblogic server that comes with Jdeveloper.

While implementing that we need to create "Model" project and "User Interface" project. Model used to store Entity, Views, ViewLinks , Associations and Application modules. User Interface stores Page Definitions, JSF pages.

Preparing Data Model


Figure: 1

Before proceeding with Entity Object creation we need to create a database connection in Jdeveloper IDE Connections and test using "Test Connection" button, and the Connection name appears under IDE Connections. Model object uses that connection.


Figure: 2

Create an entity object


Figure: 3

Database schema is automatically selected based on the already created database connection in IDE.


Figure: 4

Entity is created based upon a database table; we need to select proper table from a list of available tables which comes as an output of "Clicking on" the "Query" button.


Figure: 5


Figure: 6

"Emp" database table should have one Primary key defined on it. Otherwise it will ask for "ROWID" to be set as a primary key. I have used Empno as primary key.


Figure: 7

By selecting "Generate Entity Object class" we assure that a java class will be created with all getter and setter methods of "Emp" table.


Figure: 8

By default a View object is created with select statement subjected to all columns of underlying entity. Entity will be abstracted from user standpoint; only this view is exposed to them as data control. We will have a clear picture as we move forward with this blog.


Figure: 9

Views can't work alone until they are bounded with Application module. So we need to create an application module on top of the view.


Figure: 10


Figure: 11

We can attach more than one view here. In this work around I have single view so I have added that one with newly created Application Module.


Figure: 12


Figure:13

Preparing User Interface:


Figure: 14

Create a page with any of available template, any way we can modify our template any time we want while developing project.


Figure:15

Our page form is divided into two facets "first" and "second" horizontally. In second facet we can add one panel splitter which contains two facets dividing entire "second" facet into vertically. As a result of above code our entire page looks like below


Figure: 16


Figure: 17

From data control palate we need to select "EmployeeEntityObjectView" under "SampleAppModuleDataControl" and drag it to the region shown above. We will be prompted to use rich face from available rich faces. We need to select ADF Read Only Table.


Figure: 18

Search:


Figure: 19

Adding a where clause makes that view to be executed with parameters that comes from users who are trying to search the database tables based on Deptno and Empno.


Figure: 20

ThisDeptNo and ThisEmpNo is used as bind variables, so we need to define these two variables while creating View.


Figure 21


Figure: 22

To make sure that created view becomes accessible from User Interface project we need to add that view in data control and it can be done when that view is added in application module first.

Modifying User Interface:


Figure: 23


Figure: 24


Figure: 25


Figure: 26


Figure: 27

Update:


Figure: 28

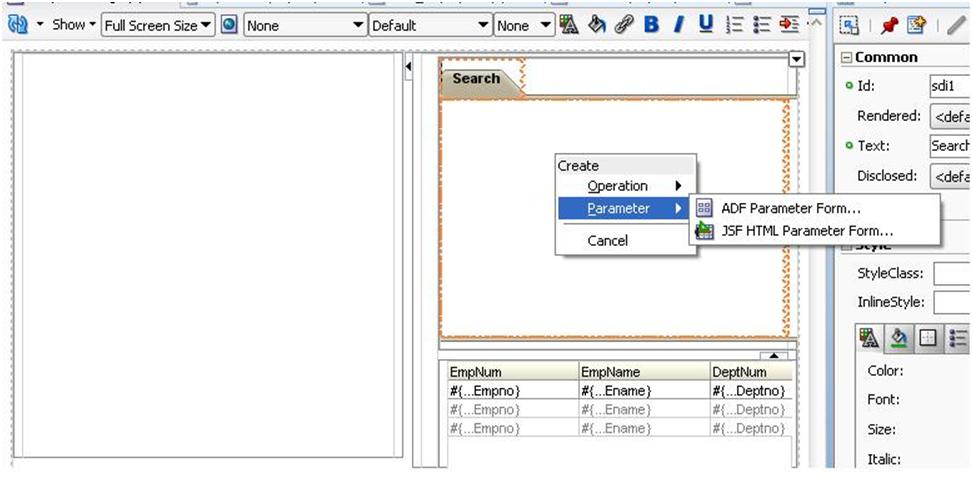
According to Figure 23 we have used "panelTabbed" with one Detail Item named "search". Now while incorporating update operation in our page we need to add one detail item named "update" after "search".

Same as we have done for retrieving data from table we need to select "EmployeeEntityObjectView" under "SampleAppModuleDataControl" and drag it to the region under "update" detail item. We will be prompted to use rich face from available rich faces.

We need to select ADF Form. We can retain all default labels in the wizard that appears next in our screen or we can change the label, but we need to select the checkbox that comes beside "Navigation pane" lower in that wizard.

By default our navigation pane consist of 4 command buttons like "First", "next", "Previous", "last", we can delete any of them if we don't require the functionality. I have deleted "First" and "Last" button. To let changed data be persisted in database we need to go to Data control palate and select "Commit" operation under "Operation" node of "SampleAppModuleDataControl" and drag it below form which is created to support update functionality. By default the button text comes as same name of operation (Commit) but we can change it. I have changed it to "update". We need to set the "Disabled" attribute to "default" from Property palate of that button.

As a result your entire page will become


Figure: 29

Create:


As discussed in previous section for incorporating updates functionality in our page, we can do the same for create operation also. Please refer below figures to do the same.


Figure: 30


Figure: 31

Delete:


We need to go to Data control palate and select "Delete" operation under "Operations" node of "EmployeeEntityObjectView" under "SampleAppModuleDataControl" and drag it below form which is created to support update functionality. By default the button text comes as same name of operation (Commit) but we can change it. I have changed it to "update". We need to set the "Disabled" attribute to "default" from Property palate of that button.

After Incorporating all functionality our complete page looks like


Figure: 32

Deploy and Test:


In Jdeveloper select "SampleADFPage.jspx" from list of applications and right click on it and you will get an option to run it. Once it is deployed in embedded server the page comes as below


Create an Employee:

  • Click on "Create Another" button and then enter data in all corresponding fields and then click on "persist".

Delete an Employee:

  • Click on "Delete" button and then click on "Persist".

Update an Employee:

  • Go to Update tab
  • Modify those fields that you want to modify and then click on "update" button.