Showing posts with label BPEL. Show all posts

Wednesday, February 22, 2012

Using Customized Email template in BPEL Email Activity


In this post I am going to share an example of sending email using BPEL email activity where email body uses a customize template. We can follow http://technology.amis.nl/blog/6019/configure-soa-suite-11g-for-sending-email-notifications-with-google-mail blog for configuring our SOA server with Google SMTP settings. This step needs to be done at first level otherwise we can’t send email using our BPEL email activity.

In this post I am not focusing on how we are sending email using BPEL email activity, instead I am trying to show how we can use a template in email body.

Please download attached ZIP file from below location http://www.box.com/s/sx35479gbtvs386qhhqk for complete project that I have used here. One small change needs to be done. After downloading that project please modify the to and cc domain value in DVM file so that BPEL process can follow suitable to address and cc address.

Friday, September 2, 2011

BPEL Composites start recovery automatically , Creating Instances after 5 minute: Dealing with Automatic Recovery Settings


In our production server we faced this typical issue and initially thought of having problem in our JCA adapter. The issue was few BPEL process faulted instance starts automatically and again faulted for same reason and we had no control over its start time. As shown in below snap shot our BPEL composite first faulted on 29th August 7:33:59 PM and again starts on 30th August 00:00:36 AM. As a result huge number of faulted instance piled up and crashes the server.

image

As a fix we shift our thoughts from JCA adapter Retrying bug to SOA Server Recovery settings. Initially we are searching for bug in JCA adapter, as we thought that JCA adapter retry settings make that happens. But actually SOA server automatic Recovery Settings tried that faulted instances to recover for a certain period of time. Please refer below screen shot for default values of SOA Server Automatic Recovery.

Detail description for those attributes are explained by oracle, please refer http://download.oracle.com/docs/cd/E14571_01/relnotes.1111/e10133/soa.htm#RNLIN1052.

image

Step 1: As a fix we went to our Production server and expand SOA and then right click to soa-infra and select BPEL properties. Please refer below screen shot.

image

Step 2: Select “More BPEL Configuration Properties” (Refer Below Screen shot)

image 

Step 3: Select “RecoveryConfig” (Refer Below Screen shot)

image

Step 4: Change Stop Window Time to 00:00 (same as Start Window time , so Recovery Period becomes negligible).

image

Sunday, June 19, 2011

Oracle SOA composite Deployment and Migration using WLST script

Deployment

Step 1: Prepare execution location and codebase in the server where SOA is installed

We need to create a directory in the server location where SOA installed .From that directory we need to execute our deployment scripts.For example, I assume that directory as /app/deployment. Similarly for codebase we need to create another directory. I assume that directory as /app/codebase. We need to put our composite project source here (Not application file[.jws])

Step 2: Generate Configuration Plan:

Configuration plan is created based on composite.xml. This plan is used to modify server references in BPEL process.After developing SOA composites using JDeveloper , we need to generate configuration plan file by right clicking on the composite.xml file.
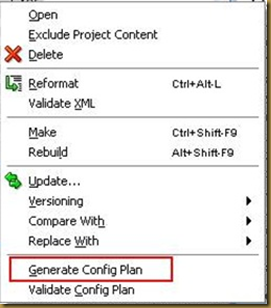
image


We can SFTP that Composite project folder including the configuration file to /app/codebase.

Step 3: Create Deployment Property file

We need to create a property file under /app/deployment directory. Sample Property file will look like below. Named the property file as deploy<BPEL Name>.properties.

  1. filenamewithpath=<SAR file location>
  2. oraclehome=<Oracle Home Location>
  3. apphome=<codebase location>
  4. processName=<Composite Name>
  5. configPlan=<Configuration plan location>
  6. description="BPEL process"
  7. serverurl=<admin server url>
  8. bpelversion=2.0

Note: we need to change the Property file name and its content for other BPEL process.


Step 4: Create Python Script

We need to create a python script file [/app/deployment/compileComposite.py] to compile BPEL source code and create SAR file. A sample python script is as below.

  1. import os
  2. if os.environ.has_key('wlsUserID'):
  3. wlsUserID = os.environ['wlsUserID']
  4. if os.environ.has_key('wlsPassword'):
  5. wlsPassword = os.environ['wlsPassword']
  6. sca_package(apphome,processName,bpelversion,oracleHome=oraclehome)
  7. exit()

to know more about sca_package () please find below link http://download.oracle.com/docs/cd/E12839_01/web.1111/e13813/custom_soa.htm

we need to create python script file [/app/deployment/soa_common_deployment.py] to deploy SAR files created from above python script after attaching configuration file created from above step.

A sample python script is as follows.

  1. import os
  2. if os.environ.has_key('wlsUserID'):
  3. wlsUserID = os.environ['wlsUserID']
  4. if os.environ.has_key('wlsPassword'):
  5. wlsPassword = os.environ['wlsPassword']
  6. connect( url='t3://cbicdg-pcp06:6001', adminServerName='soa_server1')
  7. print "server url[",serverurl,"] filename with path [",filenamewithpath,"] bpel version [",bpelversion,"] configPlan [",configPlan,"]"
  8. sca_attachPlan (filenamewithpath, configPlan,true,true)
  9. sca_deployComposite (serverurl,filenamewithpath,true)
  10. exit()

Note: Unlike property file we need not to change the python file for different BPEL processes.

To know more about sca_attachPlan(),sca_deployComposite() please visit below link http://download.oracle.com/docs/cd/E12839_01/web.1111/e13813/custom_soa.htm

Step 5 : Create Build [Shell] script

We need to create a shell script which will execute above python scripts recursively for all interfaces. Below shell script will ask for Interface name and based on given name it will load corresponding property file and execute python Scripts.

  1. while :
  2. do
  3. echo "Enter Process Name to be build and deploy[default none]: "
  4. read processName
  5. echo /app/deployment/deploy$processName.properties
  6. cp /app/oracle/product/wls1032/aia11g/aia_instances/aia11gdev/config/.adf/META-INF/adf-config.xml /app/codebase/$processName/SCA-INF/classes/META-INF
  7. export wlsttoolhome=(Location of wlst.sh script under SOA server installation normally it resides under wls1032/soa11g/common/bin)
  8. export wlsUserID=$1
  9. export wlsPassword=$2
  10. cd $wlsttoolhome
  11. pwd
  12. ./wlst.sh -loadProperties /app/deployment/deploy$processName.properties /app/deployment/compileComposite.py
  13. mv /app/codebase/$processName/deploy/sca\_$processName\_rev2.0.jar /app/codebase/$processName/deploy/sca_$processName.jar
  14. cp /app/codebase/$processName/deploy/sca_$processName.jar /app/deployment
  15. ./wlst.sh -loadProperties /app/deployment/deploy$processName.properties /app/deployment/soa_common_deployment.py
  16. done
  17. exit()

Note:

If your BPEL process refer MDS storage then we need to define that location in adf-config.xml file.So proper adf-config.xml will refer proper mds. So in above shell script we copy standard adf-config.xml which comes with AIA installation to our SOA project [Please refer Line 6]


Step 6 : Modify Configuration file:

We need to Modify generic auto generated configuration plan by including searchReplace components and use the targeted instance host name and port name in search and replace component like below.

image

Migration:

Here I assume migration happens from DEV to TEST so below places needs to changed from DEV references to TEST references.

1. In configuration file like above.

2. In property file the admin server references and Oracle home  needs to be changed based on TEST server references

3. In build script below lines needs to be modified based on Test server references.

image

Execute WLST utility

Execute the build script from /app/deployment and pass weblogic admin userid and weblogic admin password as argument. Before execution please give chmod 755 to that build.sh (refer step 5). Sample command for executing python script as follows

./build.sh <weblogic userid > <password>

if prompted please give the SOA composite name.

Note: “Deploying composite success” confirms the successful deployment.

Monday, November 1, 2010

Customizing standard Input output of BPEL Process

Modifying Input XSD:
BPEL designer by default uses string for input as well as output. while dealing with complex interfaces we need to update input and output structure in such a way that it will meet all requirements. By default the schema looks like below. 
<schema attributeFormDefault="unqualified" elementFormDefault="qualified" targetNamespace="http://xmlns.oracle.com/DatabaseToFileAdapter" xmlns="http://www.w3.org/2001/XMLSchema"> <element name="DatabaseToFileAdapterProcessRequest"> <complexType> <sequence> //Input Element <element name="input" type="string"/> </sequence> </complexType> </element> //Output Element <element name="DatabaseToFileAdapterProcessResponse"> <complexType> <sequence> <element name="result" type="string"/> </sequence></complexType> </element> </schema>
The example I have shown here is to take ProjectName, Status and Role as input and after querying database it will show other project details like hostname,port, location,domain etc. Please refer below Figure 1 and Figure 2 for input and Output.
image  Figure 1
image
Figure 2
Figure 1 is used to describe input and Figure 2 is used to describe Output format.
we can edit “DatabaseToFileAdapterProcessRequest” element like below instead of a simple string.
image
After querying database fetched data structure looks like below.
image
Figure 2
Our next step will be incorporating those structures in BPEL file by Creating variables and using those variables in rest of the files. Please note down below things
  • Make sure that used targetnamespace for xsd also present in BPEL process. Check Process section of the BPEL process for below entry
    <process name="DatabaseToFileAdapter" targetNamespace="http://xmlns.oracle.com/DatabaseToFileAdapter" xmlns:client="http://xmlns.oracle.com/DatabaseToFileAdapter"
  • Make sure Input and Output variable is referring modified input and output element of xsd via default message types of wsdl.
    <variables> <!-- Reference to the message passed as input during initiation --> <!-- Reference to the message that will be returned to the requester--> <variable name="inputVariable" messageType="client:DatabaseToFileAdapterRequestMessage"/> <variablename="outputVariable" messageType="client:DatabaseToFileAdapterResponseMessage"/> </variables>
  • messageType specified above refers message from WSDL file.Please see belowimage
  • Similarly the response message is using “DatabaseToFileAdapterResponse” element of the xsd.

Modifying BPEL standard WSDL:
  • Another way of achieving above objective is to import another xsd in wsdl file.
image
  • Make sure that the targetnamespace for imported xsd is used in WSDL definition as xml namespace prefix.
  • <definitions name="DatabaseToFileAdapter" targetNamespace="http://xmlns.oracle.com/DatabaseToFileAdapter" xmlns="http://schemas.xmlsoap.org/wsdl/" xmlns:client="http://xmlns.oracle.com/DatabaseToFileAdapter" //below name space prefix needs to be added in order to utilize defined elements in that schema xmlns:db="http://xmlns.oracle.com/pcbpel/adapter/db/SlectProjDetailsByProjName" xmlns:plnk="http://schemas.xmlsoap.org/ws/2003/05/partner-link/">
  • We need to modify the Message element for “DatabaseToFileAdapterResponseMessage” in such a way that it will refer element belongs to imported xsd.
image
  • Make sure that InputVariable and OutputVariable referring to newly modified xsd rather than old default xsd.
image   expand the outputVariable node and make sure that you will get modified structure instead of the old structure.
image

Saturday, October 23, 2010

ServletException in BPELProcessManagerBean class for getDefaultRevision method and Work Around

I met below error

  1. javax.servlet.ServletException -
  2. com.collaxa.cube.ejb.impl.BPELProcessManagerBean.
  3. getDefaultRevision
while upgrading my SOA server 10.1.3.4 to 10.1.3.4MLR by applying the patch 7586063.While log in to my BPEL console I got below error screen

image

while looking to the log file(%ORACLE_HOME%/opmn/logs/default_group~oc4j_soa~default_group~1.log) I figured out the method named getDefaultRevision() is missed or some problem occurs in that.

  1. <2010-10-23 11:12:25,781> <FATAL> <default.collaxa.cube.activation> <AdapterFramework::Inbound>
  2. java.lang.NoSuchMethodException:
  3. com.collaxa.cube.ejb.impl.BPELProcessManagerBean.getDefaultRevision(com.oracle.bpel.client.BPELProcessId,
  4. com.oracle.bpel.client.auth.DomainAuth)
        at
  5. com.oracle.bpel.client.util.ExceptionUtils.handleServerException(ExceptionUtils.java:91)
        at
  6. com.oracle.bpel.client.BPELProcessHandle.getDescriptor(BPELProcessHandle.java:208)
        at
  7. oracle.tip.adapter.fw.jca.AdapterFrameworkListenerImpl.onInit(AdapterFrameworkListenerImpl.java:160)
       
  8. at oracle.tip.adapter.fw.agent.jca.JCAActivationAgent.setupEndpoint(JCAActivationAgent.java:1041)
        at
  9. oracle.tip.adapter.fw.agent.jca.JCAActivationAgent.initiateInboundJcaEndpoint(JCAActivationAgent.java:941)

While investigating I came across few brainstorming facts.

  1. This error comes while loading all domains,more preciously after loading all Processes.
  2. Activation Agent is throwing error and the dependent classes too.

As BPEL Console shows error in com.collaxa.cube.ejb.impl.BpelProcessManagerBean it comes to my mind about ejb-ob-engine.jar and we can find the jar file in %SOA_HOME%\j2ee\<AS_Instance>\applications\orabpel but after applying the patch upgraded jar file got created in %SOA_HOME%\bpel\system\j2ee\ejb directory with oc4j as suffix in file name and old ejb-ob-engine.jar should be replaced by the new jar file. But it may not happen while applying the patch.

As a workaround

I have stopped Oracle SOA server first using opmnctl stopall and then I have copied  'ejb_ob_engine_oc4j.jar' file from
%SOA_HOME%\bpel\system\j2ee\ejb\ejb_ob_engine_oc4j.jar to %SOA_HOME%\j2ee\<AS_Instance>\applications\orabpel and renamed it to ‘ejb_ob_engine.jar’.

image

I have restarted the server using opmnctl startall and BPEL Console works like a charm.

image

Friday, May 14, 2010

Difference between Sync and Async BPEL process

As the name suggests a Synchronous and Asynchronous BPEL(Business Process Execution Language) process can be defined based on their operational behavior.

If Triggering point of a BPEL process waits until a response returns from the same, then it can be recognized as Synchronous in behavior and if it continues with next set of operation then the process is asynchronous.

Now we can trill down bit for its architectural differences. Each and every BPEL process irrespective of Sync or Async can be exposed as an external Web Service which can be defined by Web Service Description Language (WSDL).

Two Port Type:

Asynchronous BPEL process is having two Port Types and each of them supports single operation. According to the figure SampleAsyncBpel process WSDL is having onePortType named "SampleAsyncBpel" which supports operation "process". Operation Process is having one input message named "SampleAsyncBpelRequestMessage".
Another PortType is "SampleAsyncBpelCallback" supports operation processResponse which is having input message named "SampleAsyncBpelResponseMessage".

Two Partner Link Role:

SampleAsyncBpel partnerLinkType binds the provider and requester roles into an asynchronous conversation. Each role corresponds to a single port type.
Provider role uses "SampleAsyncBpel" port type where as Requester role uses "SampleAsyncBpelCallback" port type.

Now how these matter in BPEL Process:

Partner Link in BPEL process accepts both provider and requester role.The name is given in BPEL itself but the type is referring from WSDL file. Provider role from WSDL is mapped to myRole attribute and requester role from WSDL is mapped to partnerRole attribute.

<partnerLivk name="sampleasyncbpel_client" partnerLinkType="client:SampleAsyncBpel" myRole="SampleAsyncBpelProvider" partnerRole="SampleAsyncBpelRequester"/>

Receive activity is gateway for every BPEL process and uses portType corresponds to provider role.

<receive name=receive_input partnerLink="sampleAsyncBpel_client" portType="client:sampleAsyncBpel" [uses provider role in wsdl] operation="process" variable="inoutVariable" createInstance="yes"/>

callback activity only occurs in asynchronous BPEL process

<invoke name="callbackClient"
partnerLink="sampleasyncbpel_client"
portType="client:SampleAsyncBpelCallback"
operation="processResponse"

inputVariable="outputVariable"/>

How it differs from a Synchronous BPEL process

Single PortType and partnerLinkType instead of two.In asynchronous BPEL process two portTypes are defined and each portType corresponds to a single operation but in synchronous BPEL process we can see Single portType is defined with single operation.

According to above picture SampleSyncBpel supports single operation named "Process" and it is having one request message and one response message.

<wsdl:portType
name="SampleSyncBpel">

<wsdl:operation name="process">
<wsdl:input message="client:SampleSyncBpelRequestMessage" />
<wsdl:output message="client:SampleSyncBpelResponseMessage"/>
</wsdl:operation>
</wsdl:portType>

Synchronous BPEL process WSDL is having single partnerLinkType instead of two. And it supports only Provider role [no requester role as Asynchronous] which uses portType defined above.

<partnerLink
name="samplesyncbpel_client"
partnerLinkType="client:SampleSyncBpel"
myRole="SampleSyncBpelProvider"/>


synchronous BPEL process has one reply activity instead of callback.

<reply name="replyOutput"
partnerLink="samplesyncbpel_client"
portType="client:SampleSyncBpel"
operation="process"
variable="outputVariable"/>