Friday, September 2, 2011

BPEL Composites start recovery automatically , Creating Instances after 5 minute: Dealing with Automatic Recovery Settings


In our production server we faced this typical issue and initially thought of having problem in our JCA adapter. The issue was few BPEL process faulted instance starts automatically and again faulted for same reason and we had no control over its start time. As shown in below snap shot our BPEL composite first faulted on 29th August 7:33:59 PM and again starts on 30th August 00:00:36 AM. As a result huge number of faulted instance piled up and crashes the server.

image

As a fix we shift our thoughts from JCA adapter Retrying bug to SOA Server Recovery settings. Initially we are searching for bug in JCA adapter, as we thought that JCA adapter retry settings make that happens. But actually SOA server automatic Recovery Settings tried that faulted instances to recover for a certain period of time. Please refer below screen shot for default values of SOA Server Automatic Recovery.

Detail description for those attributes are explained by oracle, please refer http://download.oracle.com/docs/cd/E14571_01/relnotes.1111/e10133/soa.htm#RNLIN1052.

image

Step 1: As a fix we went to our Production server and expand SOA and then right click to soa-infra and select BPEL properties. Please refer below screen shot.

image

Step 2: Select “More BPEL Configuration Properties” (Refer Below Screen shot)

image 

Step 3: Select “RecoveryConfig” (Refer Below Screen shot)

image

Step 4: Change Stop Window Time to 00:00 (same as Start Window time , so Recovery Period becomes negligible).

image

Monday, August 8, 2011

Achieving “While” functionality in XSL using recursive custom template call


Few days before I came across one XSL transformation business requirement where an xml element of Input data is having  two sub elements named “NumberBlockVON” and “NumberBlockBIS” . Name of these two is mentioned by our business user.  “NumberBlockVON” will have a positive Integer value and same happens for “NumberBlockBIS” . Now the requirement was whatever value specified as “NumberBlockBIS” that will be treated in output xml as “the power of” the value specified for “NumberBlockVON” . It means in out put xml “NumberBlockVON” will pass as it is but the value for “NumberBlockBIS” will be replaced by the <NumberBlockVON> to the power of <NumberBlockBIS>.
&lt;PickPackShipCustomElement&gt; &lt;NumberBlockVON&gt;5&lt;/NumberBlockVON&gt; &lt;NumberBlockBIS&gt;6&lt;/NumberBlockBIS&gt; &lt;/PickPackShipCustomElement&gt;
Now if it is a java requirement we can finished it off easily by writing a looping construct with the limit from 0 to <NumberBlockBIS>, and multiply the <NumberBlockVON> that many times. But here the problem is XSL constructs can loop through xml nodes , but it can’t loop through from 0 to any other specific value with in a single xml node. So we cant depend on XSL given constructs.
We use a custom XSL template to achieve this and call the template recursively with tuned parameters.<NumberBlockVON> value and <NumberBlockBIS>value is passed as a parameter to the template.How we achieve this is explained below with code snippet.


&lt;xsl:templatename="whileImplTemplate"&gt;
&lt; !--parameter limit_var is used to hold value of NumberBlockBIS which is used as a power value
--&gt;
&lt;xsl:paramname="limit_var"/&gt;
&lt; !--parameter var is used to hold value of NumberBlockVON which is used as a base value
--&gt;
&lt;xsl:param name="var"/&gt;
&lt; !--parameter Outvar is used to hold output value 
--&gt;
&lt;xsl:param name="Outvar" select="1"/&gt; &lt;xsl:param name="count_index" select="0"/&gt; &lt;xsl:variable name="out_var" select="$Outvar"/&gt;
&lt; !--while logic Implementation
--&gt;
&lt;xsl:choose&gt;
&lt; !--Is limit achieved --&gt;
    &lt;xsl:when test="$count_index &lt; $limit_var"&gt;
&lt; !--recursive template call if limit does not achieved--
&gt;
&lt;xsl:call-template name="whileImplTemplate"&gt; &lt;xsl:with-param name="limit_var" select="$limit_var"/&gt; &lt;xsl:with-param name="var" select="$var"/&gt; &lt;xsl:with-param name="count_index" select="number($count_index)+1"/&gt; &lt;xsl:with-param name="Outvar" select="number($var)*number($out_var)"/&gt; &lt;/xsl:call-template&gt;
&lt; !-- End template --&gt;
&lt;/xsl:when&gt; &lt;xsl:otherwise&gt; &lt;xsl:value-of select="$out_var"/&gt;
&lt; !--If limit achieved then print value --&gt;
    &lt;/xsl:otherwise&gt;
  &lt;xsl:choose&gt;
&lt;/xsl:template&gt; 
As a result the output comes like below
&lt;PickPackElement&gt; &lt;NumberBlockVON&gt;5&lt;/NumberBlockVON&gt; &lt;NumberBlockBIS&gt;15625&lt;/NumberBlockBIS&gt; &lt;/PickPackElement&gt;

Sunday, June 19, 2011

Oracle SOA composite Deployment and Migration using WLST script

Deployment

Step 1: Prepare execution location and codebase in the server where SOA is installed

We need to create a directory in the server location where SOA installed .From that directory we need to execute our deployment scripts.For example, I assume that directory as /app/deployment. Similarly for codebase we need to create another directory. I assume that directory as /app/codebase. We need to put our composite project source here (Not application file[.jws])

Step 2: Generate Configuration Plan:

Configuration plan is created based on composite.xml. This plan is used to modify server references in BPEL process.After developing SOA composites using JDeveloper , we need to generate configuration plan file by right clicking on the composite.xml file.
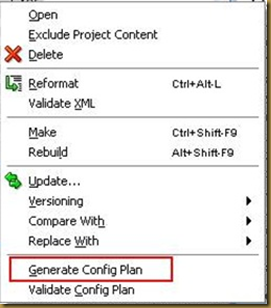
image


We can SFTP that Composite project folder including the configuration file to /app/codebase.

Step 3: Create Deployment Property file

We need to create a property file under /app/deployment directory. Sample Property file will look like below. Named the property file as deploy<BPEL Name>.properties.

  1. filenamewithpath=<SAR file location>
  2. oraclehome=<Oracle Home Location>
  3. apphome=<codebase location>
  4. processName=<Composite Name>
  5. configPlan=<Configuration plan location>
  6. description="BPEL process"
  7. serverurl=<admin server url>
  8. bpelversion=2.0

Note: we need to change the Property file name and its content for other BPEL process.


Step 4: Create Python Script

We need to create a python script file [/app/deployment/compileComposite.py] to compile BPEL source code and create SAR file. A sample python script is as below.

  1. import os
  2. if os.environ.has_key('wlsUserID'):
  3. wlsUserID = os.environ['wlsUserID']
  4. if os.environ.has_key('wlsPassword'):
  5. wlsPassword = os.environ['wlsPassword']
  6. sca_package(apphome,processName,bpelversion,oracleHome=oraclehome)
  7. exit()

to know more about sca_package () please find below link http://download.oracle.com/docs/cd/E12839_01/web.1111/e13813/custom_soa.htm

we need to create python script file [/app/deployment/soa_common_deployment.py] to deploy SAR files created from above python script after attaching configuration file created from above step.

A sample python script is as follows.

  1. import os
  2. if os.environ.has_key('wlsUserID'):
  3. wlsUserID = os.environ['wlsUserID']
  4. if os.environ.has_key('wlsPassword'):
  5. wlsPassword = os.environ['wlsPassword']
  6. connect( url='t3://cbicdg-pcp06:6001', adminServerName='soa_server1')
  7. print "server url[",serverurl,"] filename with path [",filenamewithpath,"] bpel version [",bpelversion,"] configPlan [",configPlan,"]"
  8. sca_attachPlan (filenamewithpath, configPlan,true,true)
  9. sca_deployComposite (serverurl,filenamewithpath,true)
  10. exit()

Note: Unlike property file we need not to change the python file for different BPEL processes.

To know more about sca_attachPlan(),sca_deployComposite() please visit below link http://download.oracle.com/docs/cd/E12839_01/web.1111/e13813/custom_soa.htm

Step 5 : Create Build [Shell] script

We need to create a shell script which will execute above python scripts recursively for all interfaces. Below shell script will ask for Interface name and based on given name it will load corresponding property file and execute python Scripts.

  1. while :
  2. do
  3. echo "Enter Process Name to be build and deploy[default none]: "
  4. read processName
  5. echo /app/deployment/deploy$processName.properties
  6. cp /app/oracle/product/wls1032/aia11g/aia_instances/aia11gdev/config/.adf/META-INF/adf-config.xml /app/codebase/$processName/SCA-INF/classes/META-INF
  7. export wlsttoolhome=(Location of wlst.sh script under SOA server installation normally it resides under wls1032/soa11g/common/bin)
  8. export wlsUserID=$1
  9. export wlsPassword=$2
  10. cd $wlsttoolhome
  11. pwd
  12. ./wlst.sh -loadProperties /app/deployment/deploy$processName.properties /app/deployment/compileComposite.py
  13. mv /app/codebase/$processName/deploy/sca\_$processName\_rev2.0.jar /app/codebase/$processName/deploy/sca_$processName.jar
  14. cp /app/codebase/$processName/deploy/sca_$processName.jar /app/deployment
  15. ./wlst.sh -loadProperties /app/deployment/deploy$processName.properties /app/deployment/soa_common_deployment.py
  16. done
  17. exit()

Note:

If your BPEL process refer MDS storage then we need to define that location in adf-config.xml file.So proper adf-config.xml will refer proper mds. So in above shell script we copy standard adf-config.xml which comes with AIA installation to our SOA project [Please refer Line 6]


Step 6 : Modify Configuration file:

We need to Modify generic auto generated configuration plan by including searchReplace components and use the targeted instance host name and port name in search and replace component like below.

image

Migration:

Here I assume migration happens from DEV to TEST so below places needs to changed from DEV references to TEST references.

1. In configuration file like above.

2. In property file the admin server references and Oracle home  needs to be changed based on TEST server references

3. In build script below lines needs to be modified based on Test server references.

image

Execute WLST utility

Execute the build script from /app/deployment and pass weblogic admin userid and weblogic admin password as argument. Before execution please give chmod 755 to that build.sh (refer step 5). Sample command for executing python script as follows

./build.sh <weblogic userid > <password>

if prompted please give the SOA composite name.

Note: “Deploying composite success” confirms the successful deployment.

Friday, December 31, 2010

Create a node in Oracle Hyperion Data Relation Ship Management (DRM)

LiveJournal Tags:
In this post I am trying to show how we can create a node in Oracle Data Relation Ship Management using in build API’s for DRM . Before proceeding for actual development we need to make our project ready so that it will able to get all In build API’s. First of all we need to download Oracle DRM SDK using below link http://www.oracle.com/technetwork/middleware/bi-foundation/downloads/hyperion-data-relationship-111120-089726.html.
DRM sdk provides below artifacts
image Figure 1
but we need only jar files belongs to dist/lib and thirdparty to create below libraries for our Jdeveloper Project. Jdeveloper 11.1.1.3 is the IDE I am using for developing the project.
image Figure 2 
where library “Thirdparty” contains below jar files.I prefer those jar files needs to be copied to project folder, I mean from DRM SDK zip file (from figure 1) to project folder.
image
DRMAPI library contains dist/lib/hdrm-proxy-api.jar and xerces library contains thirdparty/xerces/xerces.jar. After doing all setups we can move for development.
please follow below code block for adding a node in DRM.


public class AddDRMNode { //declare variables that needs to be initialized and //used through out the class Identify the DRM server //to which we are trying to make request String aUrl = "&lt;Url of DRM server&gt;"; //Initialize master data management IMasterDataManagement masterDataManagement = null ; //Initialize TRemSessionInfo TRemSessionInfo sessionInfo = null ; //Initialize Current Version String CurrentVersion = null ; //Initialize list of hierarchy Objects ArrayOfStringHolder hierobjects= null ; public AddDRMNode(){} public void addNode( String &lt;DRM UserId&gt;, String &lt;DRM Password&gt;, Sring node) { //get instance of mdm masterDataManagement = MasterDataManagementUtils . getMasterDataManagementFacade ( new URL (aUrl)); //get session try{ sessionInfo = masterDataManagement. getSessionMgr (). createSession (&lt;DRM Server User ID&gt;, &lt;DRM Server Password&gt;, "ProductVersion=11.1.1,CleartextPassword=True"); } catch ( Exception e) { logger. info ("unable to get session");} //get hold of current version currentversion = "Current"; //get list of all hierarchies under Current version. here listHierObjects //is a method which returns list of hierarchies.Defined later in my post try { hierobjects = listHierObjects(this.sessionInfo, currentversion); logger. info ("there are [" + hierobjects.value.length + "] hierarchy objects for version [" + currentversion + "]"); } catch ( Exception e) { logger. info ("Hierarchies are not found"); } //looping through the Current Hierarchy for ( int i = 0; i &lt; hierobjects. value . length ; i++) { logger. info ("[" + i + "] hierarchy value is [" + hierobjects. value [i] + "]"); //Obtain a hierarchy locator using version and current hierarchy value hierlocator = getHierLocator(currentversion, hierobjects. value [i]); //get hold of hierarchy prefix using the hierarchy locator try { prefix = getHierarchyPrefix(hierlocator); //update passed argument node as a concat with prefix node = prefix+ node; logger. info ("Customer to be added :[" + node + "]"); } catch ( Exception e) { logger. info ("Problem retrieving Hierarchy Prefix"); e. printStackTrace (); } //get IHier_PortyType for node addition ihierpt = this .masterDataManagement. getHier (); //get hold of parent node try { parentnode = ihierpt. nodeByAbbrev (hierlocator, &lt;Parrent node name&gt;); logger. info ("ID of Unmapped node is" + parentnode. getID() ); } catch ( Exception e) { logger. info ("parent node does not exist"); e. printStackTrace() ; break ; } //get hold of nodelocator object for parent node TRemLocalNodeLocator nodelocator = getTremLocalNodeLocator(currentversion, hierobjects.value[i], localnode. getDisplayByString ()); try { //check whether passed node is existed, isnodeExist is //defined later. passed argument is //locator of parent node,Local node object,node to be added if (isnodeExist(nodelocator, this.masterDataManagement. getLocalNode (), node)) { logger. info ("Node Exists in UNMAPPED"); } else { logger. info ("Node does not exist, going to add"); //addNode passed arguments are hierarchy locator //node to be added,parent node ID,boolean value to decide //whether added node is leaf or limb ihierpt. addNode (hierlocator, node, parentnode.getID(), true); } } catch ( Exception e) { logger. info ("Exception odue to node handling, It may be mapped earlier in parent Node"); } } } private boolean isNodeExist( TRemLocalNodeLocator nodelocator, ILocalNode localnode, String node ) { //obtain list of descendent nodes for parent node TRemLocalNode [] descendentArray = localnode. fillChildrenSorted (nodelocator); boolean flagExist = false ; for ( int i=0;i&lt;=descendentArray. length ;i++) { //if parent nodes display equals to passed node //then set flag equals to true if (descendentArray[i]. equals (). getDisplayByString (). equals (node)) { flagExist = true ; } } //return flag return flagExist; } //This method take session and version as input and returns list of hierarchies as output //private ArrayOfStringHolder listHierObjects(TRemSessionInfo sessionInfo, String versionId) throws Exception { //Get IVersion object to invoke methods for retriving list of hierarchies IVersion versionOfInterest = this.masterDataManagement. getVersion (); ArrayOfStringHolder hierarchies = new ArrayOfStringHolder() ; //obtain list of hierarchies versionOfInterest.listHiers(sessionInfo. getSession (), versionId, hierarchies); return hierarchies; } //This method takes version and hierarchy name as input and returns //TRemHierarchy locator as output public TRemHierLocator getHierLocator( String versionID, String hierarchyname) { TRemHierLocator tremhierlocator = new TRemHierLocator (); tremhierlocator. setSession ( this .sessionInfo. getSession ()); tremhierlocator. setVersion (versionID); tremhierlocator. setHier (hierarchyname); return tremhierlocator; } //This procedure takes hierarchy locator object as input and //returns valid prefix stringfor that hierarchy as output private String getHierarchyPrefix( TRemHierLocator hierLocator) throws Exception { logger . info ("Hierarchy prefix for " + hierLocator. getHier ()); String prefix = this .masterDataManagement. getHier (). fillStrPropValue (hierLocator, DRM_HIERARCHY_PREFIX_FINDER); return prefix; } }

Monday, November 1, 2010

Customizing standard Input output of BPEL Process

Modifying Input XSD:
BPEL designer by default uses string for input as well as output. while dealing with complex interfaces we need to update input and output structure in such a way that it will meet all requirements. By default the schema looks like below. 
<schema attributeFormDefault="unqualified" elementFormDefault="qualified" targetNamespace="http://xmlns.oracle.com/DatabaseToFileAdapter" xmlns="http://www.w3.org/2001/XMLSchema"> <element name="DatabaseToFileAdapterProcessRequest"> <complexType> <sequence> //Input Element <element name="input" type="string"/> </sequence> </complexType> </element> //Output Element <element name="DatabaseToFileAdapterProcessResponse"> <complexType> <sequence> <element name="result" type="string"/> </sequence></complexType> </element> </schema>
The example I have shown here is to take ProjectName, Status and Role as input and after querying database it will show other project details like hostname,port, location,domain etc. Please refer below Figure 1 and Figure 2 for input and Output.
image  Figure 1
image
Figure 2
Figure 1 is used to describe input and Figure 2 is used to describe Output format.
we can edit “DatabaseToFileAdapterProcessRequest” element like below instead of a simple string.
image
After querying database fetched data structure looks like below.
image
Figure 2
Our next step will be incorporating those structures in BPEL file by Creating variables and using those variables in rest of the files. Please note down below things
  • Make sure that used targetnamespace for xsd also present in BPEL process. Check Process section of the BPEL process for below entry
    <process name="DatabaseToFileAdapter" targetNamespace="http://xmlns.oracle.com/DatabaseToFileAdapter" xmlns:client="http://xmlns.oracle.com/DatabaseToFileAdapter"
  • Make sure Input and Output variable is referring modified input and output element of xsd via default message types of wsdl.
    <variables> <!-- Reference to the message passed as input during initiation --> <!-- Reference to the message that will be returned to the requester--> <variable name="inputVariable" messageType="client:DatabaseToFileAdapterRequestMessage"/> <variablename="outputVariable" messageType="client:DatabaseToFileAdapterResponseMessage"/> </variables>
  • messageType specified above refers message from WSDL file.Please see belowimage
  • Similarly the response message is using “DatabaseToFileAdapterResponse” element of the xsd.

Modifying BPEL standard WSDL:
  • Another way of achieving above objective is to import another xsd in wsdl file.
image
  • Make sure that the targetnamespace for imported xsd is used in WSDL definition as xml namespace prefix.
  • <definitions name="DatabaseToFileAdapter" targetNamespace="http://xmlns.oracle.com/DatabaseToFileAdapter" xmlns="http://schemas.xmlsoap.org/wsdl/" xmlns:client="http://xmlns.oracle.com/DatabaseToFileAdapter" //below name space prefix needs to be added in order to utilize defined elements in that schema xmlns:db="http://xmlns.oracle.com/pcbpel/adapter/db/SlectProjDetailsByProjName" xmlns:plnk="http://schemas.xmlsoap.org/ws/2003/05/partner-link/">
  • We need to modify the Message element for “DatabaseToFileAdapterResponseMessage” in such a way that it will refer element belongs to imported xsd.
image
  • Make sure that InputVariable and OutputVariable referring to newly modified xsd rather than old default xsd.
image   expand the outputVariable node and make sure that you will get modified structure instead of the old structure.
image

Saturday, October 23, 2010

ServletException in BPELProcessManagerBean class for getDefaultRevision method and Work Around

I met below error

  1. javax.servlet.ServletException -
  2. com.collaxa.cube.ejb.impl.BPELProcessManagerBean.
  3. getDefaultRevision
while upgrading my SOA server 10.1.3.4 to 10.1.3.4MLR by applying the patch 7586063.While log in to my BPEL console I got below error screen

image

while looking to the log file(%ORACLE_HOME%/opmn/logs/default_group~oc4j_soa~default_group~1.log) I figured out the method named getDefaultRevision() is missed or some problem occurs in that.

  1. <2010-10-23 11:12:25,781> <FATAL> <default.collaxa.cube.activation> <AdapterFramework::Inbound>
  2. java.lang.NoSuchMethodException:
  3. com.collaxa.cube.ejb.impl.BPELProcessManagerBean.getDefaultRevision(com.oracle.bpel.client.BPELProcessId,
  4. com.oracle.bpel.client.auth.DomainAuth)
        at
  5. com.oracle.bpel.client.util.ExceptionUtils.handleServerException(ExceptionUtils.java:91)
        at
  6. com.oracle.bpel.client.BPELProcessHandle.getDescriptor(BPELProcessHandle.java:208)
        at
  7. oracle.tip.adapter.fw.jca.AdapterFrameworkListenerImpl.onInit(AdapterFrameworkListenerImpl.java:160)
       
  8. at oracle.tip.adapter.fw.agent.jca.JCAActivationAgent.setupEndpoint(JCAActivationAgent.java:1041)
        at
  9. oracle.tip.adapter.fw.agent.jca.JCAActivationAgent.initiateInboundJcaEndpoint(JCAActivationAgent.java:941)

While investigating I came across few brainstorming facts.

  1. This error comes while loading all domains,more preciously after loading all Processes.
  2. Activation Agent is throwing error and the dependent classes too.

As BPEL Console shows error in com.collaxa.cube.ejb.impl.BpelProcessManagerBean it comes to my mind about ejb-ob-engine.jar and we can find the jar file in %SOA_HOME%\j2ee\<AS_Instance>\applications\orabpel but after applying the patch upgraded jar file got created in %SOA_HOME%\bpel\system\j2ee\ejb directory with oc4j as suffix in file name and old ejb-ob-engine.jar should be replaced by the new jar file. But it may not happen while applying the patch.

As a workaround

I have stopped Oracle SOA server first using opmnctl stopall and then I have copied  'ejb_ob_engine_oc4j.jar' file from
%SOA_HOME%\bpel\system\j2ee\ejb\ejb_ob_engine_oc4j.jar to %SOA_HOME%\j2ee\<AS_Instance>\applications\orabpel and renamed it to ‘ejb_ob_engine.jar’.

image

I have restarted the server using opmnctl startall and BPEL Console works like a charm.

image

Monday, October 18, 2010

Working with ADF Choice Elements

Asking user to enter data based on ADF choice element is not a tricky one

where as capturing the data selected by user and use it to fulfill other purpose is really a tricky task. We can drag an exposed view object from Data control and drop it in our webpage then automatically we will be asked for the “Selection Type”. After Selecting a type it will create underlying iterator and Bindings and the page got displayed with proper selection types.But if user wants to display some other details based upon selected data then how we can use this selected data.

In this post I am trying to implement how entered data using choice element
got captured in backing bean.

Single Selection Choice Elements:

image

Figure 1

As above figure shows three types of single choice element is available in ADF and they are “select one list box”(refer figure 2),“select one choice” (refer figure 3) and “select one radio”(refer figure 4)

image  Figure 2

imageFigure 3 image Figure 4

I have used command link and as user clicks on it, backing bean method get invoked and selected data is shown as output. To achieve that we need to follow below steps.

  1. Define the action listener for command link where user needs to click to
    view the output

    <af:commandLink text="view Output"id="cmdlnk2" actionListener="#{viewScope.TestADFBean.viewOPSelOneLB}"/>

    Bind the element for showing output as a backing bean property using binding
    attribute

    <af:inputText value="" binding="#{viewScope.TestADFBean.outputBinding1}"label="Select Country"id="it1"></af:inputText>


  2. Backing bean procedure is as follows

    1. public void viewOPSelOneLB( ActionEvent actionEvent) { //Get the specific binding Container
    2. BindingContainer bindings = BindingContext . getCurrent (). getCurrentBindingsEntry (); //Get the sepecific list binding using the binding name passed as argument to the get method of binding container
    3. JUCtrlListBinding listBinding = ( JUCtrlListBinding )bindings. get ("CountryEntityObjectView11"); //Get selected value
    4. Object sel = listBinding. getSelectedValue ();
    5. System.out. println (sel);
    6. outputBinding1. setVisible (true); //Set selected value to already binded property
    7. outputBinding1. setValue ("Output From SelectOneListBox [" + sel + "]");
    8. }

Multiple Selection Choice Elements:

image

Figure 5

As above picture depicts ADF Multiple selection consists of “Select Many Choice” (refer to Figure 7), “Select Many Shuttle”(refer to Figure 6),”Select Many List Box”(refer to Figure2),Select Many Check Box is same as “Select One Radio” as shown in Figure 4 but the difference is Check Box(please refer the drop down element of Figure 7) occurs instead of Radio button and user can select more
than one value which is not possible in Radio button.
image image
Figure6 Select Many Shuttle                                        Figure 7 ADF select Many Choice

For displaying data selected by user using multiple choice selection is exactly same except the backing bean method(Step 1 and Step 2 is same as above).

Backing bean method is as follows.

  1. public void SelectInputLsnrForShuttle( ActionEvent actionEvent) { //Get Binding Conatiner
  2. BindingContainer bindings = BindingContext . getCurrent (). getCurrentBindingsEntry (); //Get the sepecific list binding
  3. JUCtrlListBinding listBinding = ( JUCtrlListBinding )bindings. get ("CountryEntityObjView_LOV1"); //Get all Selected Values
  4. Object[] str = ( Object[] )listBinding. getSelectedValues ();
  5. StringBuffer buf = new StringBuffer (); //Append all Selected objects to a buffer
  6. for ( int i =0;i<str. length ();i++){
  7. buf. append (" ");
  8. buf. append (str[i]);
  9. buf. append (" ");
  10. System.out. println (buf. toString() );
  11. }
  12. opBindingForShuttle. setVisible (true); //Set selected value
  13. opBindingForShuttle. setValue (buf. toString() );
  14. }